GOK Manual V2.3
Sun Java Desktop System Documentation Team
This manual describes version 0.11.9 of GOK.
Copyright © 2004 Sun Microsystems, Inc.
Copyright��© 2003, 2004 GOK Development Team
Copyright © 2002, 2003 ATRC
Feedback
To report a bug or make a suggestion regarding the GOK application or this manual, follow the directions in the GNOME Feedback Page.
Table of Contents
- Introduction
- Getting Started
-
- To Start GOK
- When You Start GOK
- Usage
-
- To Use the Compose Keyboard
- To Manipulate GOK Windows
- To Use Mouse Functions
- To Start Applications
- To Navigate and Use the Desktop and Desktop Applications
- To Access Application Menus
- To Access Application Toolbars
- To Quit GOK
- Preferences
-
- Appearance Preferences
- Keyboards Preferences
- Actions Preferences
- Feedback Preferences
- Access Methods Preferences
- Prediction Preferences
The GNOME On-Screen Keyboard (GOK) application displays virtual keyboards on your screen that you can operate using the standard mouse pointer or an alternative pointing device. GOK displays the following types of keyboards:
- Compose keyboardThe compose keyboard enables you to type alphanumeric characters to compose text by selecting the characters from the keyboard.
- Dynamic keyboardsGOK generates keyboards that contain keys to represent the applications that are running on your desktop or the menus that are contained in an application.
You can start GOK in the following ways:
- Menu
- Choose Applications->Accessibility->On-Screen Keyboard.
- Command line
- Execute the following command: gokYou can use the -d option to specify default settings.
If support for assistive technologies is not enabled on your system when you start GOK, the following Warning window appears:
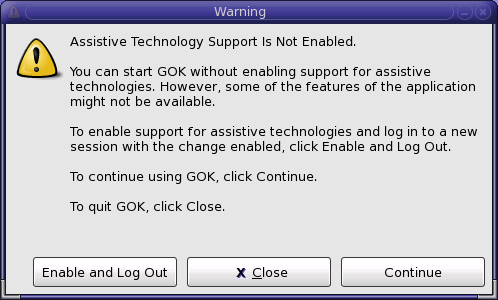
To use the full capabilities of GOK, activate the Enable and Log Out button. When you log in again and start GOK, support for assistive technologies is enabled and the Information window is not displayed.
When you start GOK with support for assistive technologies enabled, the GOK – main window appears:
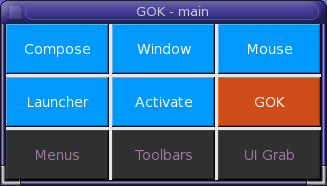
The GOK – main window contains the following keys that you can activate to display a variety of different keyboards:
- Compose
- Displays a compose keyboard.
- Window
- Displays keys to enable you to move or resize the GOK windows.
- Mouse
- Displays keys that emulate standard mouse controls.
- Launcher
- Displays keys to enable you to start other applications.
- Activate
- Displays keys to enable you to navigate and use the desktop and the applications that are currently running on the desktop.
- GOK
- Displays keys to enable you to access information about the GOK application such as Help and Preferences, and also to exit the application.
- Menus
- Displays keys to reflect the menu items that are contained in the current application.
- Toolbars
- Displays keys to reflect the toolbar items that are contained in the current application.
- UI Grab
- Displays keys to reflect user interface elements that the user can interact with, other than menus or toolbar items. For example, the UI Grab feature displays keys that represent the buttons that are displayed on a dialog.
To use the compose keyboard feature of GOK, activate Compose in the GOK – main window. The GOK – Keyboard window is displayed.
The GOK compose keyboard is a standard alphanumeric keyboard. You can customize the type of compose keyboard that GOK displays in the GOK Preferences dialog. See the section called “Keyboards Preferences” for more information.
GOK uses the spaces at the top of the keyboard for word prediction, if you enable the word prediction options in the GOK Preferences dialog.
The method that you use to select and activate the keys on the keyboards depends on the option that you select in the GOK Preferences dialog. See the section called “Access Methods Preferences” for more information.
To return to the GOK – main window at any time, activate Back.
To hide the keyboard, activate Hide. To display the keyboard again, activate Show.
To access standard text editing functions from the GOK standard keyboard, activate Edit.
Note
The Edit key is only available if you have a document open in a text editor application.
When you activate Edit, the GOK – text-operations window is displayed. The following table describes the keys that the GOK – text-operations window contains.
Table 1. Text Editing Functions
| Key | Function |
|---|---|
| c – | Move the cursor back one character. |
| word – | Move the cursor back one word. |
| line – | Move the cursor back one line. |
| sent. – | Move the cursor back one sentence. |
| c + | Move the cursor forward one character. |
| word + | Move the cursor forward one word. |
| line + | Move the cursor forward one line. |
| sent. + | Move the cursor forward one sentence. |
| Select | Activate the text selection function. |
| word | Select the current word when the Select option is enabled. |
| sent. | Select the current sentence when the Select option is enabled. |
| all | Select all of the text in the current document when the Select option is enabled. |
| Repeat Next | Activate this key to repeat the current operation until you specifically cancel the action. |
| cut | Delete the selected text. |
| paste | Insert text that you cut or copy. |
| copy | Copy selected text to the application memory. |
| ins | Return to the compose keyboard and use the keyboard to insert text at the current cursor position. |
To close the GOK – text-operations window and return to the compose keyboard, activate back.
To display the numeric keypad only on the screen, activate Num Pad in the GOK – Keyboard window.
To use GOK to launch a text editor and start to enter text in a new document, perform the following steps:
- In the GOK – main window, activate Launcher.
- In the GOK – launcher window, activate Text Editor.
- In the GOK – launcher window, activate back to return to the GOK – main window.
- In the GOK – main window, activate Compose to display the compose keyboard.
You can now use the compose keyboard to enter text in the document.
To modify or move the GOK windows, activate Window in the GOK – main window. The following table describes the keys that the GOK – move-resize window contains.
Table 2. Window Manipulation Functions
| Key | Function |
|---|---|
| Dock Top | Position the window at the top left of the screen and remove the window frame. Docked windows are typically not overlapped by other windows, or the amount by which docked windows can be overlapped is limited. |
| Dock Bottom | Position the window at the bottom left of the screen and remove the window frame. |
| Fill | Resize the window so that it fills the full width of the screen. |
| Left up diagonal arrow | Move the window left and upwards. |
| Up | Move the window up. |
| Right up diagonal arrow | Move the window right and upwards. |
| Narrower | Decrease the width of the window. |
| Left | Move the window left. |
| Float | Select this option to undock a window that is already docked so that you can move the window around the screen. Windows that are not docked are called floating windows. Other windows can overlap floating windows. |
| Right | Move the window right. |
| Wider | Increase the width of the window. |
| Left down diagonal arrow | Move the window left and downwards. |
| Down | Move the window down. |
| Right down diagonal arrow | Move the window right and downwards. |
| Shorter | Decrease the height of the window. |
| Hide | Hide the GOK – move-resize window. |
| Repeat Next Key | Activate this key to repeat the current window manipulation action until you select another action. For example, if this key is selected and you activateDown, GOK continues to move the window down until you select another action or the window cannot move down any further. |
| Taller | Increase the height of the window. |
To use mouse functions, activate Mouse in the GOK – main window. The following table describes the keys that the GOK – mouse window contains.
| Key | Function |
|---|---|
| back | Return to the GOK – main window. |
| Latch | Press-and-hold the next key that you activate until you activate the key again. For example, if you activate Latch and then activate Button 1, you can perform a drag-and-drop operation. |
| Pointer | Use the core mouse pointer to track the movement of any extended input device. |
| Repeat | Activate this key to repeat the current mouse action until you select another action. |
| NW | Move the pointer left and upwards. |
| N | Move the pointer up. |
| NE | Move the pointer right and upwards. |
| Button 1 | Activate the left mouse button. |
| W | Move the pointer left. |
| Dbl Click | Perform a double-click action. |
| E | Move the pointer right. |
| Button 2 | Activate the middle mouse button. |
| SW | Move the pointer left and downwards. |
| S | Move the pointer down. |
| SE | Move the pointer right and downwards. |
| Button 3 | Activate the right mouse button. |
To start standard applications from GOK, activate Launcher in the GOK – main window. The following table describes the keys that the GOK – launcher window contains.
To move focus around the desktop environment, activate the Activate key in the GOK – main window. The GOK – Window List window contains keys that represent the desktop components and applications that are currently running. For example, the GOK – Window List window may contain the following keys:
GOK dynamically generates keyboards to reflect the menus on the application that currently has focus. To view and access the menus for the current application, activateMenus in the GOK – main window. The GOK – Menus window contains a key for each menu that is contained on the application menubar. For example, if the Terminalapplication currently has focus, and you activate Menus in the GOK – main window, the GOK – Menus window contains the following keys:
- File
- Edit
- View
- Terminal
- Tabs
- Help
When you activate a key that represents a menu, a new keyboard is displayed that contains a key for each menu item that is contained on that menu in the application.
GOK dynamically generates keyboards to reflect the toolbar items on the application that currently has focus, if the application contains a toolbar. To view and access the toolbar items for the current application, activate Toolbars in the GOK – main window. The GOK – Toolbars window contains a key for each toolbar item that is contained on the application toolbar.
To open the Preferences dialog, activate GOK in the GOK – main window, then activate Preferences. The GOK Preferences dialog contains the following tabbed sections:
- AppearanceThe Appearance tabbed section contains preferences to enable you to customize how the GOK windows and keys are displayed.
- KeyboardsThe Keyboards tabbed section enables you to specify the type of keyboard that GOK displays when you click the Compose key.
- ActionsIn the context of GOK, an action is a method by which you activate keys on the GOK keyboards. The Actions tabbed section enables you to select predefined actions or create new actions to suit your requirements.
- FeedbackThe Feedback tabbed section enables you to specify how you want to receive feedback when you successfully activate a key. You can also create new feedback methods to suit your requirements.
- Access MethodsThe Access Methods tabbed section enables you to specify how you access and select keys from the GOK keyboards.
- PredictionThe Prediction tabbed section enables you to select word completion or command prediction options.
- Key width
- Use this spin box to specify the width of each key that is displayed on the on-screen keyboard. The maximum width allowed is 200 pixels.
- Key height
- Use this spin box to specify the height of each key that is displayed on the on-screen keyboard. The maximum height allowed is 200 pixels.
- Spacing
- Use this spin box to specify the space between each key that is displayed on the on-screen keyboard. The maximum space allowed is 100 pixels.
- Preview
- Use this area to preview any changes that you make to the key size and spacing preferences.
- Dock
- Select this option to position the window at the top or bottom of the desktop and remove the menubar from the window. When you select this option, the Dock Topand Dock Bottom options are activated.
- Dock Top
- Select this option to position the window at the top of the desktop.
- Dock Bottom
- Select this option to position the window at the bottom of the desktop.
- Fill Width
- Select this option to expand the GOK window so that it fills the entire width of the screen.
- Use Desktop Theme Preferences
- Select this option to apply the desktop theme preferences to the GOK application. To select a desktop theme, activate the Launch button on the menu panel, then choose Preferences->Desktop Preferences->Display->Theme. If you do not select this option, the desktop theme is applied to all other applications except GOK.You must restart GOK before any change to this setting takes effect.
- Compose Keyboard
- Select one of the following options:
- Match physical keyboard as reported by X ServerSelect this option to display the same keyboard layout as the physical keyboard that is attached to the system.
- Alphanumeric keyboard sorted alphabeticallySelect this option to display a keyboard with the keys sorted in alphabetical order.
- Alphanumeric keyboard arranged by letter frequencySelect this option to display a keyboard with the keys sorted in order of usage.
- Read keyboard from fileSelect this option to display a bespoke keyboard. The keyboard contents and layout are specified in an XML file. Select the file from the drop-down list or activate Browse to search for the file.
- Custom Keyboards
- Use this drop-down list to select a directory that contains other customized keyboard files that GOK can display or activate Browse to select a directory.
- Name
- There are 12 default action methods defined in GOK as follows:
- Dwell
- Left Mouse Button
- Middle Mouse Button
- Mouse Button 4
- Mouse Button 5
- Mouse Pointer
- Right Mouse Button
- Switch 1
- Switch 2
- Switch 3
- Switch 4
- Switch 5
When you select an action method from the Name drop-down list, the settings that are associated with the action are displayed in the dialog. The settings that are displayed vary depending on the type of action that you select.
- Action Type
- The action type can be one of the following options:
- SwitchIf you select this option, the following settings are displayed:
- Switch or Button Number
- The options are Switch 1 to Switch 5.
- Behavior
- This setting determines whether the action is performed when you press the switch or release the switch. The options are as follows:
- Activate when pressed
- Activate when released
- Delay Before Activation
- This setting enables you to specify a time period that must elapse after you press or release a switch before GOK processes the action as intentional. Use the spin box to specify the time period in 100ths of a second.
- ValuatorIf you select this option, the following settings are displayed:
- Valuator Type
- The options are as follows:
- X-Y Valuator
- Single axis
- Behavior
- The options are as follows:
- Activate on Enter
- Activate on Dwell
- Activate on Move
- Timers and Delays
- The 100ths of a second spin box allows you to specify the time period for which you must hold the pointer over a key before GOK processes the action as intentional. Specify the time period in 100ths of a second.
- Use key averaging
- This option is not currently available.
- Sensitivity
- Use this slider to specify the sensitivity of the pointing device.
- SwitchIf you select this option, the following settings are displayed:
- Event Source
- This setting determines the type of input device that you use to access and navigate the keyboard. The event source can be one of the following options:
- Core pointer
- Other input device
- Joystick
- Name
- There are five default feedback methods defined in GOK as follows:
- Key flashing
- None
- Sound one
- Sound two
- Speech
Depending on the feedback method that you select, the following options are available.
- Enable key flashing
- Select this option to see the key flash when you activate a key.
- Key flashes
- When you select the Enable key flashing option, use this spin box to select the number of times the key flashes when you activate a key.
- Enable sound
- Select this option to hear a sound when you activate a key.
- Sound
- When you select the Enable sound option, use this drop-down list to select the sound file to play when you activate a key. You can also activate Browse to search for a file.
- Speak key label
- Select this option to hear the name of the key when you activate a key.
To add a new feedback method, perform the following steps:
- Activate Add.
- Type a name for the feedback method in the Name field.
- Select the options that you want for the feedback.
To delete a feedback method, select the feedback method that you want to delete from the Name drop-down list, then activate Delete.
- Method
- There are seven access methods defined in GOK for selecting a key on a keyboard, as follows:
- 5 Switch DirectedThis method enables you to use four switches to move the mouse pointer around the keyboard in four directions; up, down, left, and right. You use a fifth switch to activate the selected key.
- Automatic ScanningThis method enables you to press a switch to start selecting the rows and keys on the keyboard in sequence. When the application reaches the key that you require, you press another switch to activate the key.
- Direct SelectionThis method enables you to use a direct mouse click. You use the mouse pointer to select a key and then press a switch to activate the key.
- Dwell SelectionThis method enables you to use a mouse or other pointing device to position the mouse pointer over a key for a specified period of time to select and activate the key.
- Inverse ScanningThis method enables you to press and hold a switch to start selecting the rows and keys of the keyboard. When you release the switch, the application stops the selection operation on the current key and you press another switch to activate the selected key.
- Single Key Automatic ScanningThis method enables you to press a switch to start the application to automatically select each key on the keyboard in sequence. When the application reaches the key that you require, you press another switch to activate the key.
- Single Key Inverse ScanningThis method enables you to press and hold a switch to select each key on the keyboard. When you release the switch, the application stops the selection operation on the current key and you press another switch to activate the selected key.
Depending on the access method that you select, the Operation, Feedback, and Options preferences differ, as described in the following sections.
If you select the Automatic Scanning, Inverse Scanning, Single Key Automatic Scanning, or Single Key Inverse Scanning method, the Operation preferences are as follows:
- Scan
- Use the drop-down list to select the action that is required to start selecting the keys. For example, if you want to activate the right mouse button to start the selection operation, select Right Mouse Button from the drop-down list.
- Activate
- Use the drop-down list to select the action that is required to activate a selected key.
If you select the Direct Selection or Dwell Selection method, the Operation preferences are as follows:
- Select
- Use the drop-down list to select how you want to select a key on the keyboard.
- Activate
- Use the drop-down list to select the action that is required to activate a selected key.
If you select the 5 Switch Directed method, the Operation preferences are as follows:
- Up
- Use the drop-down list to select the switch that you want to use to move the mouse pointer up.
- Down
- Use the drop-down list to select the switch that you want to use to move the mouse pointer down.
- Left
- Use the drop-down list to select the switch that you want to use to move the mouse pointer left.
- Right
- Use the drop-down list to select the switch that you want to use to move the mouse pointer right.
- Activate
- Use the drop-down list to select the action that is required to activate a selected key.
The feedback preferences are the same for all access methods as follows:
- Movement
- Use the drop-down list to select how you want to receive feedback when you are highlighting keys on the keyboard. The following options are available:
- Key flashing
- None
- Sound one
- Sound two
- Speech
- Activation
- Use the drop-down list to select how you want to receive feedback when you activate a key on the keyboard. The options that are available are the same as those listed above.
If you select the Automatic Scanning, Inverse Scanning, Single Key Automatic Scanning, or Single Key Inverse Scanning method, the Options preferences are as follows:
- Scan Delay
- Use this spin box to specify the speed at which the application highlights the rows and keys.
- Initial Delay (Automatic Scanning and Single Key Automatic Scanning methods only)
- Use this spin box to specify the time delay before the application starts to select the keys on the keyboard.
- Wrap Rows/Columns
- No information available.
- Scanning Direction
- Select one of the following options to determine the direction in which the application selects the rows and keys:
- Top/Bottom
- Bottom/Top
- Left/Right
- Right/Left
- Cycles Before Stopping
- Use this spin box to specify how many selection cycles the application performs before the application stops selecting keys.
Note
If you select the 5 Switch Directed method, only the Scan Delay and Wrap Rows/Columns as described above are available.
- Enable word completion
- Select this option to enable the word prediction function when you are using the compose keyboard.
- Number of predictions
- When you select the Enable word completion check box, use this spin box to specify the number of predictions that GOK attempts.
- Use extra word list file
- When you select the Enable word completion check box, select this option to specify additional word lists from which to predict the words. For example, you can select a word list that contains words that are specific to a project. Enter the path and filename for the word list in the field provided or activate Browse to search the file system for the file.
- Enable command prediction
- This option is not currently available.
- Number of predictions
- This option is not currently available.